Text Generator with Human Editors
Jul 13, 2021
Text processing and its lesser understood cousin, text generation are massively transformative artificial intelligence technologies which have the potential to transform industries. This is a deep dive into a hybrid human-machine (cyborg) text generation application I built on Flask with GPT2.
Project Summary:
Flask Web App wrapper for GPT2, with administrative protection capabilities and dual-user type, including a, “sponsor” and an, “editor” which can interact with machine generated text.
Language Generator Programs Documentation
Author
Patrick Delaney, July 2021
Dependencies
| Description / Purpose | Badge | Note |
|---|---|---|
| Language Models | ||
| DNN Toolkit | ||
| Web App |  |
|
| Database Mapper | ||
| Container Image | ||
| Database Adapter | Do not use binary for production. |
Table of Contents
- Repos Covered and General Description
- Getting Started - How to Install and Run
- Project Structure for Machine Learning
- Credits
- License
Repos Covered and General Description
Repo Description
Link to Repo
The main link to the repo being referenced in this documentation is immediately below.
| Item | Link | Description |
|---|---|---|
| src flask (or source flask) | src flask | A fully functional application which serves as a breadcrumb along the journey to creating a fully secured, deployable language generation application using python-flask and postgres. |
That being said, there are several, “breadcrumb,” applications which preceded this application, building in various milestones of functionality along the way. For anyone who uses this application but may wish to fork off at a prior point along the build, they may want to reference one of the following endpoints.
Note, the following endpoints are ordered in reverse-sophistication, with the lower repos on the list being more basic and, “earlier,” in the process:
| Item | Link | Description |
|---|---|---|
| flasksecurity | flasksecurity | Admin dashboard with login approval as well as a review and implementation of a security plan. |
| textgeneratornotes | textgeneratornotes | Text generator Google Colab Notebook with experiments. |
| userlevelmodelsflask | userlevelmodelsflask | Dual user type login functionality. |
| postgresloginherokudockerflask | postgresloginherokudockerflask | Flask application running on Docker, with Postgres and basic login. |
| herokudockerflask | herokudockerflask | Flask on Docker deployed on Heroku |
Functionality Description
- Simply put, this application generates text using GPT2 into an organized system that would allow humans to edit the odd, information-less machine generated text into working information. In other words, it’s a cyborg text generation application.
- The app uses a combination of GPT2 and Flask integrated with Postgres to accomplish the above. The reason Flask was used is because of its flexibility and suitability for Machine Learning.
- The main challenge (but at the same time advantage) in designing this app to the point where it is at is that Flask is more or less a blank slate, which while allowing a developer to implement their own database structures and source code wherever they would like into the ad-hoc platform, also requires a lot of dependencies and structure to be built from scratch. While getting flask up and going is relatively easy to begin with, there is not a lot of documentation on how to really architect many types of applications, so work and thought needs to be put in.
- In the future this application could be further adapted to write an arbitrarily defined length of text, fine-tuned from a group of text bodies scraped from the web. Basically the idea would be to have a sponsor scrape a bunch of text using a search functionality, auto-generate machine text on a defined knowledgebase, and then pay for a human editor to perfect said text…hence, “cyborg text generation.”
Breakdown of Features
- Built in python-flask, which is a largely, “from scratch,” platform which allows source code to be embedded within the application project structure, making it superior for machine learning or language processing/generation applications. [Python is widely used in machine learning applications, flask is a web application platform which does not restrict database architecture or project folder structure to any particular layout, as would be the case in for example, python-django.]
- User classes separated into admin, sponsor and editors, with the admin having the capability to approve or reject the other two types of users prior to their activation within the system, allowing built-in resource protection.
- Built-in common security vulnerability prevention, which flask does not come with, “out of the box,” with a full analysis of which security protections have been put in place and which have not at this stage of the app, and recommendations for further steps including but not limited to: 1. Decorated Routes which restrict access to certain routes to specified user types with a simple decorator. 2. 403 Error handling. 3. XSS, Cross Site Scripting protection. 4. CSRF Cross-Site Request Forgery protection. 5.SQL Injection Prohibition. 6. Directory Transversal Protection. 7. XSS Uploaded Files. 8. JSON Security. 9. Flask Security Headers. 10. Cookie Protection. 11. X content Type Options. 12. X-Frame Options. 13. X-XSS Protection. 14. HTTP Public Key Pinning. 15. Terminal Copy Paste Protection.
- Full review of all security considerations can be found here.
- Flash shell to allow arbitrary database commands.
- SQLAlchemy integration for use with Postgres.
- Initial non-user state for greater security, e.g. initial user only created on the server itself via human command.
- CPU based operation of tensorflow - GPU/CUDA not required to generate text - therefore the development version can be run on essentially any modern 64 bit machine which can run docker.
System Requirements
Highlighted Dependencies
Breakdown of Highlighted dependencies shown at the top of this readme file.
Docker
The main desktop programs required to run this application in development mode are Docker Engine and Docker Compose, the requirements of which can be read about within the links provided.
- This application was built on an HP-Omen 870-244, 16GB of DDR4, 2.6GHz i7 Processor.
- With the dependencies listed in this readme file, one sample of machine-generated text could be created within about 30 to 60 seconds of processing time.
- Note - with GPU/CUDA installed, this time goes down to about 3-5 seconds, however that has not been included in this application.
Behind the Scenes
Motivation
The world of statistical language processing has grown significantly in the 2010’s with the introduction of cheap deep neural network learning. Neural networks allow for the focus to be on, “word embeddings,” which basically means assigning codes to words and watch for the frequency with which those codes emerge in proximity to other codes, rather than, “rule based,” language processing, which strictly defines the order or grammar of words.
Much of the attention surrounding Natural Language Processing (NLP) has been concentrated around the capability to analyze and sense intent in either open or restricted data environments, either with financial gain ramifications or cost savings ramifications. For example, in healthcare, much diagnosis data is protected from being read or analyzed by humans due to privacy concerns, but data processing may be fair game for the interests of public health improvement. NLP is one of many methods that public health may be analyzed, by reading and analyzing diagnosis information in bulk from text, health outcomes may be improved.
The reverse of language processing is language generation. If a sufficient knowledgebase of words used in particular situations can be obtained, then sentences may be written responding to cues based upon statistical models. Today these models may not contain much substantial information, and may not be able to diagnose a problem, healthcare-related or otherwise, but in the future, with sufficient rule bases and proper text generation techniques, at the very least text generation may potentially be able to serve as a labor saving aid to humans, allowing authors to select and edit pre-written paragraphs around topic matter, rather than having a person write everything themselves.
Why Build this Project
Since text generation is such an interesting area, and in particular within the healthcare domain, it makes sense to open source some concepts using standardized web and server technologies available today so that others may be able to build more sophisticated applications in the future.
What Problems this Solves
There are many text generation applications, and at the simpliest level, this application is simply a wrapper for GPT2 at this point. The purpose of this application is not to re-invent text generation, but rather to suggest a direction for managing three key challenges:
-
The human interaction between automatically generated texts, including a, “generating” function which is wholly machine-generated and an “editing” function done by humans.
-
The challenge of organizing a set of application folders into a structure which mimics data science. More specifically than that, Python-Flask tends to be a standard way to build sophisticated machine learning applications today. However it is a very open, non-strictly architectured platform, it is more or less just scaffolding. This project attempts to architect a helpful folder structure which mimics good data science project design, basically putting the machine learning source code in an appropriate server-side location and laying out a philosophy for how to organize folders and files that interact with data science projects as they scale.
-
The challenge of resource protection and security is addressed by an administrative function. Access to sophisticated GPUs at least at present is not free, or at least not in a custom application sense. Working with expensive computing resources requires some type of way to administrate and protect said resources so they are not completely open to the world.
Learned Along the Way
Some helpful tips I learned while building this project:
- Design database relational models in a way that will prevent you from having to do custom configuration. If you can link tables, link them.
- For moving to production, sometimes there may be environmental variable name conflicts, where the new production system might demand that it uses a certain variable name and value, and this could cause problems in running the application.
- Using a cheap, 3-year old GPU is roughly 10 times faster than using a CPU for two sentences of generated text on GPT2.
- Sometimes there are variable name conflicts when moving to production from development, where a server, such as Heroku, has a fixed environmental name that it may use for something, that a dependency may also use as a convention. There are hacks to get around this which had to be employed to push an older version of this application to production on Heroku. Watch out!
Getting Started - How to Install and Run
All of the above repos run on Docker. Installation instructions for Docker can be found here.
Quickstart on Ubuntu
Ubuntu Install
The quick way to get started and install on Ubuntu terminal is the following, as of 11 July 2021:
# run updates

$ sudo apt-get update

# install docker

$  sudo apt-get install \
    apt-transport-https \
    ca-certificates \
    curl \
    gnupg \
    lsb-release

# install docker GPG key

$ curl -fsSL https://download.docker.com/linux/ubuntu/gpg | sudo gpg --dearmor -o /usr/share/keyrings/docker-archive-keyring.gpg

# setup stable repository

$  echo \
  "deb [arch=amd64 signed-by=/usr/share/keyrings/docker-archive-keyring.gpg] https://download.docker.com/linux/ubuntu \
  $(lsb_release -cs) stable" | sudo tee /etc/apt/sources.list.d/docker.list > /dev/null

# install docker repo - run an update again just to be sure!

$ sudo apt-get update
$ sudo apt-get install docker-ce docker-ce-cli containerd.io

# test out to ensure you have installed docker with the basic hello world app

$ sudo docker run hello-world
Beyond the docker engine, docker-compose is also necessary. To install docker-compose, follow the instructions for Ubuntu at this link.
Or, for a quickstart guide, follow the below (as of 11 Jul 2021).
# download the current stable release of docker-compose.

$ sudo curl -L "https://github.com/docker/compose/releases/download/1.29.2/docker-compose-$(uname -s)-$(uname -m)" -o /usr/local/bin/docker-compose

# apply executable permissions to the binary

$ sudo chmod +x /usr/local/bin/docker-compose

# to test installation, check the version. The version and build should pop up if installed correctly.

$ docker-compose --version
Application Build
Once you have installed docker-compose correctly, you can then run the actual application, by navigating to the root folder within your terminal and running the below command. The root folder is defined as the folder which contains docker-compose.yml:
# build the web service

$ sudo docker-compose up --detach --build web
The above should download all dependencies and build the entire, “container environment” along with the application which gets built on top of that container environment. If you’re not familiar with containers, I recommend reading this. In short, a container environment is a slimmed down simulation of a linux environment, which can be run on any operating system, whether it be Windows, MacOS, Linux, etc. assuming that said operating system has the capability to run the container environment. In our case we’re using the container environment called, “docker.”
The reason for using containers is to eliminate some of the problems associated with moving an application from a development environment, such as a laptop, to a production environment, such as a Platform as a Service type server, such as Docker or AWS-EC2.
Once you have, “composed” the web service in detached mode using the command above, you can then inspect which, “docker images,” now exist on your machine and their respective sizes. The terms, “compose, images” are specific to docker and can be read about more within the docker documentation.
$ sudo docker images

REPOSITORY         TAG               IMAGE ID       CREATED          SIZE
userlevels_flask   latest            2c8777dd50f9   29 minutes ago   2.53GB
python             3.8-slim-buster   0e0d73ddd34d   12 days ago      114MB
postgres           13-alpine         d3a70afcf848   2 weeks ago      191MB
The “python” image is a base image upon which our application image, userlevels_flask was constructed on.
- Essentially, “python,” is a slimmed down version of a linux system which has python installed.
- The, “postgres,” image follows the same concept, but with a postgres database installed.
- “userlevels_flask” is our custom application which leverages these two below base images, as well as some other dependencies, including tensorflow, which is part of the reason for the large size of 2.53GB.
- A, “normal” flask docker application may only be perhaps in the 100MB or less range, but because we’re leveraging tensorflow, which has a base size of around 2.5GB or so, depending upon the version, we have a fairly large size to our image shown above.
The images form instruction sets upon which, “processes,” get built, the processes run the application. To inspect the processes running, run the command in terminal:
# process inspection command

$ sudo docker ps -a

| CONTAINER ID | IMAGE              | COMMAND                | CREATED           | STATUS           | PORTS                                     | NAMES |
|--------------|--------------------|------------------------|-------------------|------------------|-------------------------------------------|-------|
| b45d45623de2 | userlevels_flask   | "/usr/src/theapp/ent…" | About an hour ago | Up About an hour | 0.0.0.0:5000->5000/tcp, :::5000->5000/tcp | flask |
| c294603339c1 | postgres:13-alpine | "docker-entrypoint.s…" | About an hour ago | Up About an hour | 5432/tcp                                  | db    |
The processes shown above are:
- The database, named, “db” and run using postgres on alpine linux.
- The application, named “flask” with image name “userlevels_flask”
The endpoint for the application itself is found at:
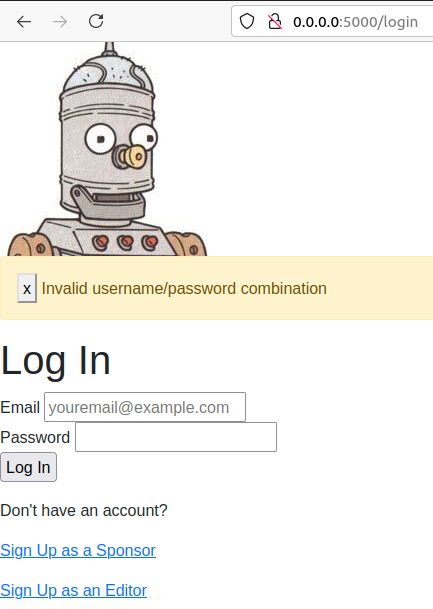
http://0.0.0.0:5000/login
Which, if you visit in your browser should bring up the main front-end, endpoint of the application, which should look like this:
Usage of Web Interface in Development Mode
There are a couple of ready-made pre-approved sponsor and editor users on development mode which can be used to log in immediately:
# sponsor user
user: test@test.com
password: 123456

# editor user
user: editor@test.com
password: 123456
Generating Text
The sponsor user has the capability to, “create” a Document. A Document includes a title, body and an attached Editor-User. When a Document is created, the machine automatically creates an, “Autodoc,” which is an automatically created text snippet, created by GPT-2, reflecting the text of the Document as input.
How Documents/Autodocs get created is shown below. Note that the amount of time it takes for a CPU to create an Autodoc has been sped up significantly. :
Viewing and Editing Previously Created Documents
Once a document is created, Sponsor-Users have the capability to go back in and edit the Document Text, Title and Editor-User, as shown below:
Playing the Editor Role
Editor-Users are simply secondary accounts which do not have access to the Autodoc capability, but have the ability to edit the Document text and title, if assigned by a Sponsor, as shown below.
Role Authentication
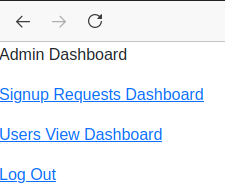
The application is designed to be secured through a multi user-type categorization, which means that an administrator user type has the capability to accept or reject other user types prior to their application access. In development mode, we have a pre-set administrator user which can be accessed via the /login page with the following credentials:
user: admin@test.com
password: password
Upon logging in as an administrator, the main dashboard shows a couple different options:
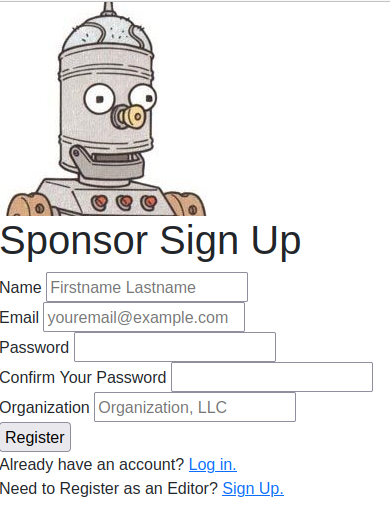
However, in order to see any pending issues or data within the, “Signup Requests Dashboard” option, we have to go back to the main sign-in page and request to sign up either as a sponsor or as an editor.
Logging out and returning to the front page, by clicking the, “Sign Up as Sponsor,” link we can go in and create a requested sponsor-user.
Pending users can be viewed on the, “Signup Requests Dashboard.”
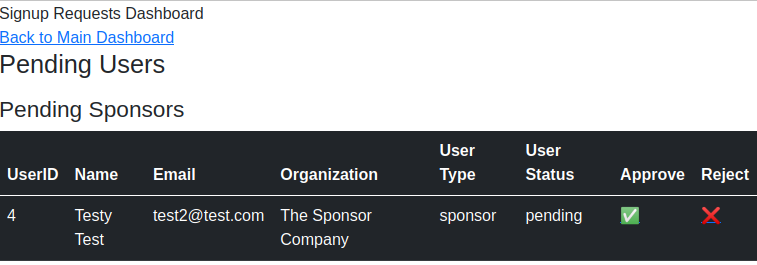
Allowing Pending Users
When a user signs up, they do not automatically have access to the application. The application protects its resources by only allowing certain paths to be accessible by certain user types.
In order for a, “new” user to gain access to a restricted resource, the admin must go in and, “Approve,” them as a user, as shown in the below video.
Project Structure for Machine Learning
Word on Monolithic Applications
This application is monolithic, in that it is designed to completely run and fit on one server. Technically, there are two, “containers” - one for the application itself, and one for the database, postgres.
As an application grows in size, or as it becomes more of an, “enterprise grade,” application with teams working through it, it starts to take more of the shape of a graph, with different parts of the application doing different things in various containers, essentially using a, “microservices,” architecture.
This Application Project Structure
The main project structure for this application, including the web application, but not zooming in on the data science portion of the project looks like the following:
├── .env.dev
├── .env.prod
├── .env.prod.db
├── .gitignore
├── docker-compose.prod.yml
├── docker-compose.yml
└── services
	├── nginx
	│   	├── Dockerfile
	│   	└── nginx.conf
	└── web
	    	├── Dockerfile
    		├── Dockerfile.prod
    		├── entrypoint.prod.sh
    		├── entrypoint.sh
    		├── manage.py
     		├── requirements.txt
    		├── project
    			├── __init__.py
    			├── assets.py
    			├── auth.py
    			├── forms.py
    			├── models.py
    			├── routes.py
    			├── config.py
    			└── static
	    			├── /css
	    			├── /dist
	    			├── /img
	    			├── /src
		    			└── js
	    			      └── style.css
    			           └── /templates
The data science portion of the project goes under static/src, even though the data itself is not static, the code which manipulates the data is static.
The paradigm here is that all of the, “web” type stuff which touches HTML and controls routes should remain within the main web-type folders that are familiar to web developers, such as the assets, auth, routes, config and models.
The models may lay out the data within relational data tables, but the static/src is where the actual data processing goes.
└── src
    │	├── features
    │	├── preperation
    │	├── preprocessing
    │	├── evaluation
    │	└──	js...
    └── tests
    │	└──	unit_tests
    └── models
    │	├── seedmodels
    │	└──	retrainedmodels
    └── data
    │	├──	raw_data
    │	├──	processed_data
    │	└──	user_input_data
    └── pipeline
    │	└──	model_retraining_automation_scripts
    └── docs
	    ├──	Documentation
	    └──	Notebooks
So for example, if raw data is inputted into the system, the folder, “/src/static/data/raw_data” does not contain the actual data itself, e.g. the data is not uploaded directly onto the server, but rather that folder would contain some file, raw_data_control.py or something similar, which would manipulate a relational database or otherwise to control where that data goes.
Other folders, for example pre-build models which output a result based upon input data, would hold code that points to those models, also stored in a relational database for example, and so on.
Alternative Data Organization Open Source Projects
The above described way of working with data only goes so far and is meant for prototyping and getting an application going. There are more sophisticated data management systems which are designed to work with existing cloud services platforms to keep data storage affordable and traceable.
The best one appears to be the following:
However, there are others:
- Quilt PyPi or Quilt Github is designed to create versioned datasets with S3.
- VespaAI (also open source)
- Polyaxon
- Seldon.io
There is also an alternative cookie cutter data science project structure format, although not integrated with flask.
How GPT2 Comes Into Play
This application does not use, “All of GPT2,” it uses a, “GPT2 head model,” as well as a, “GPT2 tokenizer,” which is available through the “transformers,” dependency by huggingface.
The meat of the actual code for that can be found here in this autodockwriter.py file.
GPT2 as a whole is a set of parameters which have been trained based upon a, “transformer model” type algorithm on a large corpus of text gathered from the web. When you use the huggingface GPT2 head model, it’s not some kind of API access to a cloud service spitting out an answer, it’s a slice of a much larger GPT2 model (of which there are three sizes). The head model has essentially been, “map reduced,” into a pattern, and we’re merely, “calling,” on that model.
There are three ways of talking about how a language model can be dealt with:
- Training a model.
- Fine Tuning a model.
- Calling or Evoking a model.
We are merely calling the model, not training or fine tuning it.
- “Training,” GPT2 costed an estimated tens of thousands of dollars in 2018/2019, and involved inputting upwards of 1.5 billion parameters (basically many bodies of text from web sources) into a massive neural network to output the different GPT2 models.
- “Fine Tuning,” involves taking the, “Head Model,” (of TFGPT2LMHeadModel namesake) which is really a dense system of decoders, and adjusting that based upon a new set of input text. This fine tuning may take a significant amount of resources, perhaps better to run using GPUs rather than a CPU, but does not necessarily require tens of thousands of dollars of resources (as of 2020).
- Evoking a model requires adjusting the Head Model similar to “Fine Tuning,” but is not as resource intensive, particularly after the first call. It’s basically just a way of applying the model against a small number of words.
The GPT2 Model - is defined as the bare GPT2 Model transformer outputting raw hidden-states without any specific head on top. In other words, this is the model output of the, “Training,” stage, straight from OpenAI.
There are several sizes of “architectures” of GPT2 Models available, including 1558M (extra large), 774M (large), 355M (medium), 124M (small). Using Transformers Configuration, one can select parameters which will be equivalent to the different sizes of models, but without selecting any parameters, which we did not, it defaults to small.
So in short, our application evokes the GPT2-small model with a header, without any fine tuning, and looks at the few words which were put into the, “text” body and computes the next few words in a sentence or two.
Rough Outline of the Math
When evoking GPT2, there are a few options for which head model algorithm type to use to search for the next word in a sequence. One option is, “Greedy Search,” which essentially just picks the next highest probability word after the previous word (or sequence of words). For example:
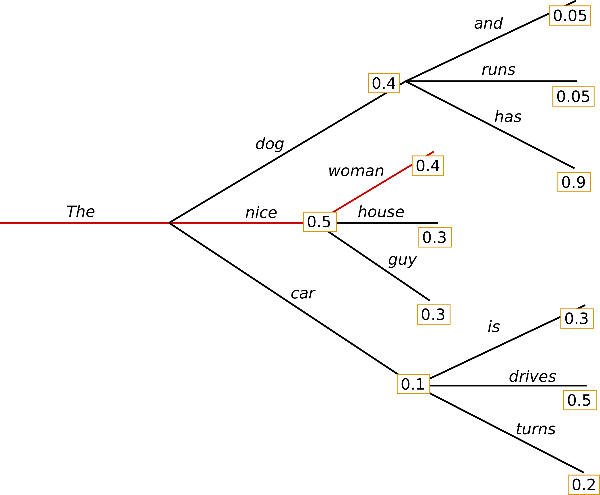
In the above scenario, the string of words put together would be, “the nice woman,” because those words are the next highest probability at each step.
Beam search instead looks at an entire sequence of words and optimizes for the highest sequence of outputs, for example:
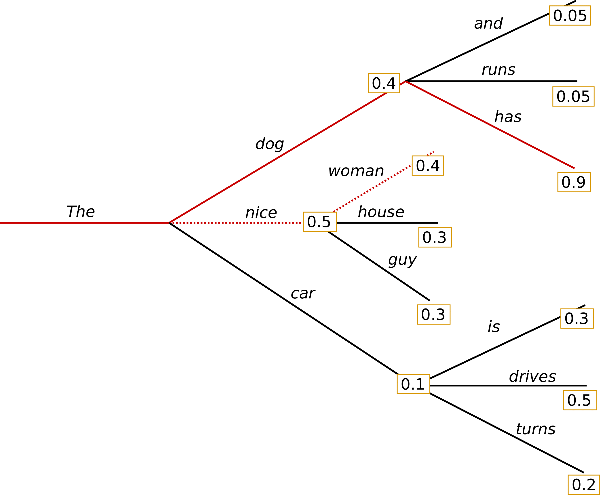
In the above scenario, the string of words put together would be, “the dog has,” because the values ascribed to the sequence of words would sum up to 0.5+0.9 = 1.4 whereas with Greedy Search, “the nice woman,” would have only scored 0.5+0.4 = 0.9.
Greedy search tends to be much more repetitive than beam search and is of, “higher quality.” The flasksrc application used beam search, however there are other options for models which produce arguably better results, including top-k sampling and top-p sampling, discussed at length in the below article.
Credits
- Created by Patrick Delaney.
- Thank you to all of the authors and contributors of the various open source dependencies used in this application, including Tensorflow, Transformers, OpenAI, Flask and many more.
License
TBD
Check out my Portfolio
Data Architecture, Machine Learning
Share